TWIPLA for Weebly
About Weebly and the TWIPLA Weebly Plugin
Weebly is a prominent website-building platform and web hosting provider with over 40 million websites created in the US alone. Its browser-based solution allows users to create websites without the need for installation, ensuring automatic updates to the Content Management System (CMS) for constant functionality and security improvements, all managed by the provider.
Weebly offers a user-friendly interface with integrated widgets and drag-and-drop functionality, enabling easy website creation and customization with elements like text, images, and apps, without requiring any programming knowledge. Additionally, Weebly supports the creation of online shops, and users can choose from a variety of design templates that can be easily edited to suit their preferences.
However, to effectively manage a Weebly site, website owners need to track their website traffic. While Weebly lacks built-in analytics, there are plugins available, such as TWIPLA, which seamlessly integrate with Weebly. Once installed, TWIPLA provides you with the following insights and functionalities for better website management:
TWIPLA App Features
Website Statistics
| Visitor Behavior Analytics
|
Visitor Communication | All features privacy-first by design and fully GDPR-compliant
|
How to Install TWIPLA on Weebly
Installing TWIPLA on your Weebly site is a straightforward and effortless process. The design and/or the process presented in the video is only informative oriented and it might be out of date. For detailed step-by-step guides on how to easily install TWIPLA on any Weebly website, please refer to the installation guides listed below:
Easy installation — Install the TWIPLA Weebly plugin
This method requires any paid Weebly plan. If you have a free Weebly plan, please check the Manual installation method.
- Log in to your Weebly account.
- Open the TWIPLA plugin page directly on Weebly App Market.
- Click Add and then Connect, and you will be redirected to the TWIPLA dashboard.
Note: The app will not start tracking your website yet, follow the steps below to get it started. - To activate tracking, go to the Weebly Website Editor, and click Publish to make your changes live.
- To view your website stats, go to Settings > My Apps > Manage App next to the TWIPLA entry.
Manual installation — Adding TWIPLA script to the Footer section
As an alternative, if you have a FREE Weebly plan, you can simply add our tracking code snippet to the footer section of your website by following these steps:
New Users
Create Your Account
1. Register for a new account here. Enter your email address and create your account password. Tick the box to agree to the Terms of Use & Data Protection Agreement and click Sign Up for Free.
Confirm Your Email Address
3. Once you receive the verification email, click Confirm Email Address to verify your email address. If the button doesn't work, click the alternative link.
Note: Be sure to click the Confirm Email Address button within 10 days to verify your account, as the account will be (temporarily) deactivated otherwise.
Insert Your Website URL
4. After verification, you will be redirected to the TWIPLA platform. The next step is to insert the website's URL you want to track data for and click "Continue." For accuracy, we recommend copying the URL directly from your browser's address bar. Please copy the URL starting from "www" and omit the protocol (HTTP/HTTPS). This approach helps ensure that the URL is complete and correct.
Select Your Privacy Preference
6. Select your preferred Data Privacy Mode for the website. By default, the Data Privacy Mode is set to Maximum Privacy. If you wish to deviate from the default setting, simply click on another of the data protection modes shown. You can change the data protection mode for a website at any time. As soon as you have decided on a mode, please click on Continue.
Manual Tracking Code Installation
10. TWIPLA requires a tracking snippet to collect data from your website. Choose between two integration methods: one integration method allows you to collect data without visitor consent. The other method requires visitor consent. Both methods collect 100% of your website data. Copy the desired tracking code and paste it before the final '</body>'-Tag of your website's source code. Don't forget to publish the changes. You can find further information on installing tracking codes here.
Open Website Editor
11. Log in to your Weebly account and open the Weebly Website Editor by clicking on Edit Site.
Verify Snippet Installation
14. After pasting the tracking code into your website's source code, click Verify Snippet Installation to confirm integration. Once successful, a message will pop up on the right of the screen saying, "The tracking code was successfully embedded!".
If you get the message, "The tracking code could not be found in the body section of your website's source!", check your website's source code to make sure that the tracking code was installed correctly.
Explore the Main Dashboards
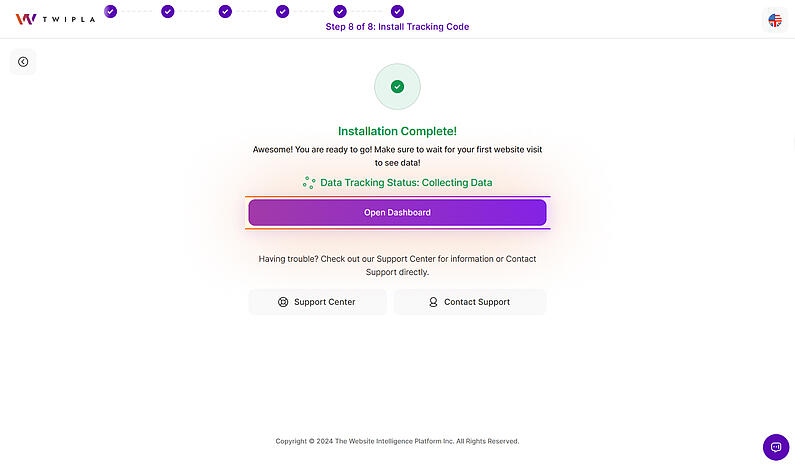
15. Click Open Dashboard to access the Main Dashboards. You can visit your live website to verify the collection of website visits to the platform and reload the dashboard to see your initial statistics.
Stuck on onboarding? Just click the Need help onboarding? link at the bottom of the onboarding steps to chat with our Support Team.
Tracking Code Status
To verify the tracking code status, navigate to Website Settings > Tracking Code. The status 'Successfully Installed' should be displayed.
If you selected 'Install Tracking Code Later' during the onboarding process or require reinstallation, copy the code provided, paste it into your website's source code, and then click Verify Snippet Installation.
Existing Users
Add New Website
1. Sign in to your existing account here. Click on the drop-down menu in the top left corner and select Add new website.
Add Your Website URL
3. Enter the URL of the website for which you want to collect data. For accuracy, we recommend copying the URL directly from your browser's address bar. Copy the URL starting from "www" and omit the protocol (HTTP/HTTPS). This approach helps ensure that the URL is complete and correct.
Set Your Privacy Preference
4. Select your preferred Data Privacy Mode for the website. By default, the Data Privacy Mode is set to Maximum Privacy. If you wish to deviate from the default setting, simply click on another of the data protection modes shown. You can change the data protection mode for a website at any time. As soon as you have decided on a mode, please click on Continue.
Install Tracking Code to Your Website
6. TWIPLA requires a tracking snippet to collect data from your website. Choose between two integration methods: one integration method allows you to collect data without visitor consent. The other method requires visitor consent. Both methods collect 100% of your website data. Copy the desired tracking code and paste it before the final '</body>'-Tag of your website's source code. Don't forget to publish the changes. You can find further information on installing tracking codes here.
Open Website Editor
7. Log in to your Weebly account and open the Weebly Website Editor by clicking on Edit Site.
Verify Snippet Installation
10. After pasting the tracking code into your website's source code, click Verify Snippet Installation to confirm integration. Once successful, a message will pop up on the right of the screen saying, "The tracking code was successfully embedded!".
If you get the message, "The tracking code could not be found in the body section of your website's source!", check your website's source code to make sure that the tracking code was installed correctly.
Troubleshooting Guide
If your website builder only allows installation of the tracking code in the header and it does not work, it's likely due to the script executing before the Document Object Model (DOM) is fully loaded. This can result in an error like 'Uncaught TypeError: b is undefined.' To resolve this issue, you can place the script in the header, but modify it to run after the DOM has fully loaded.
Here's a code snippet that accomplishes this:
<script> document.addEventListener("DOMContentLoaded", function () { (function (v, i, s, a, t) { v[t] = v[t] || function () { (v[t].v = v[t].v || []).push(arguments); }; if (!v._visaSettings) { v._visaSettings = {}; } v._visaSettings[a] = { v: '1.0', s: a, a: '1', t: t }; var b = i.getElementsByTagName('body')[0]; var p = i.createElement('script'); p.defer = 1; p.async = 1; p.src = s + '?s=' + a; b.appendChild(p); })(window, document, '//app-worker.visitor-analytics.io/main.js', 'INSERT-HERE-YOUR-WEBSITE-ID', 'va'); }); </script>
Important: Replace 'INSERT-HERE-YOUR-WEBSITE-ID' with your actual website ID.
This code ensures that the script runs only after the DOM is ready, preventing the error. However, for most websites, it's often recommended to add scripts to the bottom of the body, as this approach typically avoids such issues altogether.
Frequently Asked Questions about using TWIPLA on Weebly (FAQ)
Please see our Weebly FAQs here.
Support for Installation and Using TWIPLA on Weebly
If you encounter any issues during installation, you can reach us through:
- Email: Send us a message at support@twipla.com.
- Chat Bubble: Use the chat bubble available on our website.
- In-App Support: Access support directly within the app.
For additional details, please visit our Contact Us page. We are committed to ensuring a smooth and seamless experience with our plugin!


